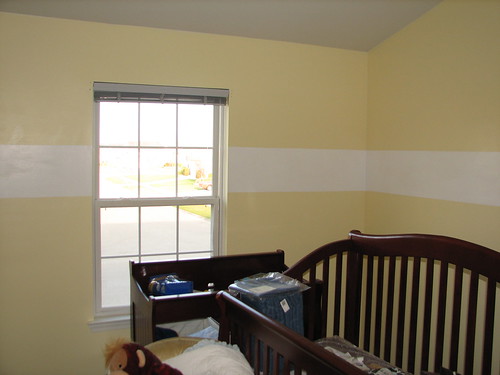
The Stripe: Part One
posted in Uncategorized |Shannon spent this past weekend in New York with her mother and (also pregnant) sister. It was a Mother’s Day gift for mom; they did lots (and lots) of baby shopping, and went to see Shannon’s High School friend Jill in Curtains on Broadway.
I stayed home and did chores, which wasn’t nearly as bad as it sounds. Spring sprang in spectacular fashion, so I got to spend the whole weekend with the windows open. There were hedges to be trimmed, a lawnmower to ready, carpets to vacuum, burgers to be grilled, and a stripe to paint.
Even though yellow is a gender-neutral color, the shade we picked for the nursery is an awfully pale yellow. So since we found out that the baby has boy parts, Shannon and Michelle (my brother’s fiancee, for those who might not know) have been designing a way to, well, butch up the joint. The result is a horizontal stripe that circles the room consisting of several shades. One of my jobs for the weekend was to get it started.
Turns out painting perfectly horizontal lines with exactly parallel edges that match up across windows, closets, and doorways is about as tricky as I’ve just made it sound. Here’s a step-by-step guide.
- Position laser level on the wall at the desired height for the top of the stripe using the sticky adhesive strip enclosed with the handy-dandy, inexpensive laser level you bought last week.
- Tape along laser line. So far so good.
- Repeat on next wall, using another adhesive strip.
- Realize that the economical but slightly flimsy laser doesn’t cross windows very well. Move laser to other side of window with another piece of adhesive and tape along laser line.
- Notice that you didn’t quite match the level up. Re-set laser line with yet another piece of adhesive.
- Realize that this cheap, lousy excuse for a laser level only came with four pieces of adhesive, and you can’t attach it to any more walls.
- Undaunted, hold the level as steady as possible while marking positions along the line with a pencil.
- I said steady, ya klutz. Do it again, if necessary saying a few words the baby shouldn’t hear.
- Use an eraser to remove the erroneous pencil lines.
- Realize that erasers to a really good job removing paint. Utter a few more naughty incantations. Resort to licking your fingers to remove the pencil lines.
- Carefully place tap against the pencil lines. Repeat until tape extends around the room. Pray the tape lines up when you’re done.
- Using a ruler, measure 12 inches down from the top line. Mark the position with a pencil.
- Use the laser level to mark dots for the lower edge of the stripe.
- Check the distance between the top line and a pencil mark further along the wall to verify that you’re maintaining the 1-foot distance.
- Realize that “level” is a relative term. Recall from your high-school trigonometry classes that small angles add up over long distances. A few more colorful metaphors will likely be necessary.
- Do what you should’ve done from the beginning, and measure your pencil marks from the top line all the way around the room.
- At some point, wonder where that extra eighth of an inch came from. Shortly thereafter, wonder where the past two and a half hours have gone, and stop caring so much about the other thing.
- Fill in the tape with paint.
- Repeat.
- Remove the tape. Given how long it took to put up, it’ll be slightly disappointing how easily it comes down.
- Make a note to push tape tighter into corners in the future, as the small gaps you left resulted in paint drips.
Other than that, everything turned out pretty well, I’ve gotta say. Here’s the end result:
